#updating PSD text layer
Explore tagged Tumblr posts
Visit Tumblr Blog
Explore Tumblr blogs with no restrictions, modern design and the best experience.
Last Seen Tumblr Blogs


Fun Fact
Mobile US users spent an average of 115.8 minutes on Tumblr app monthly.
Text
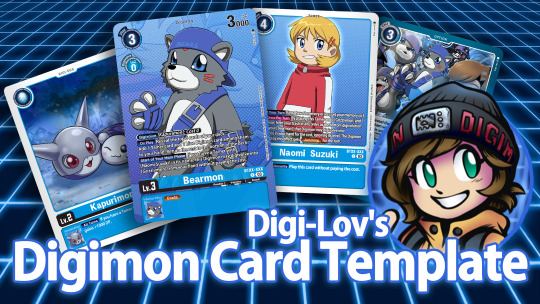
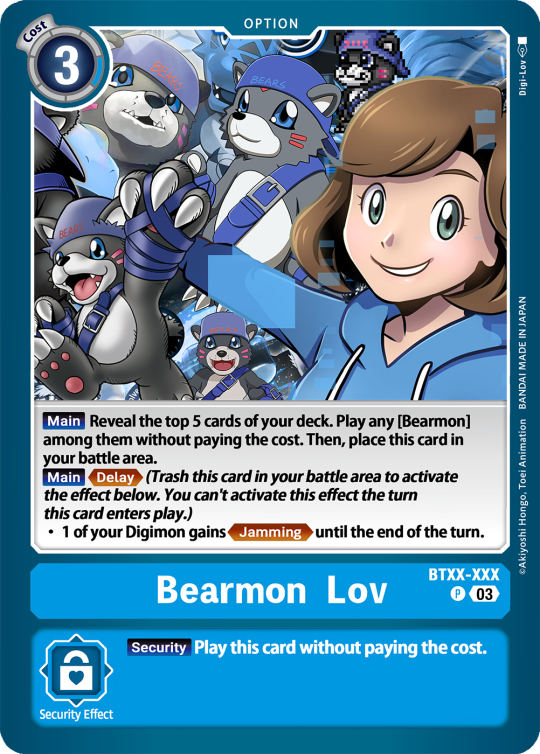
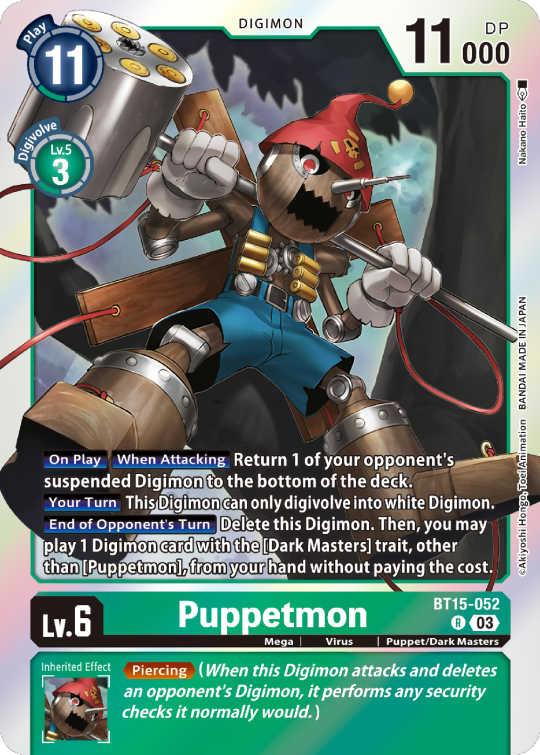
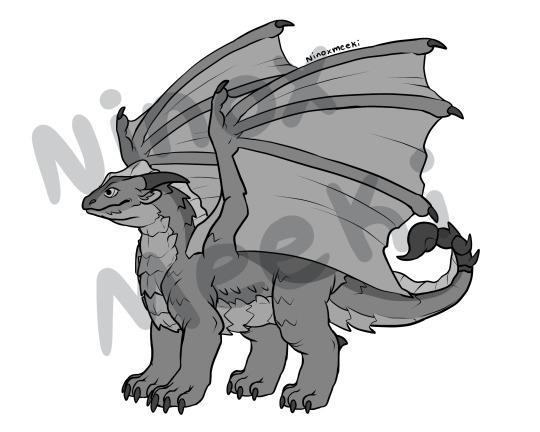
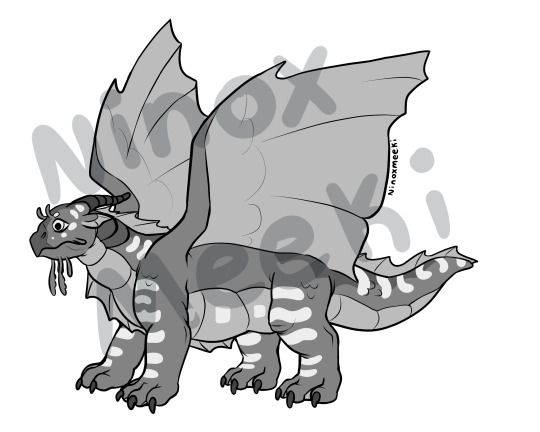
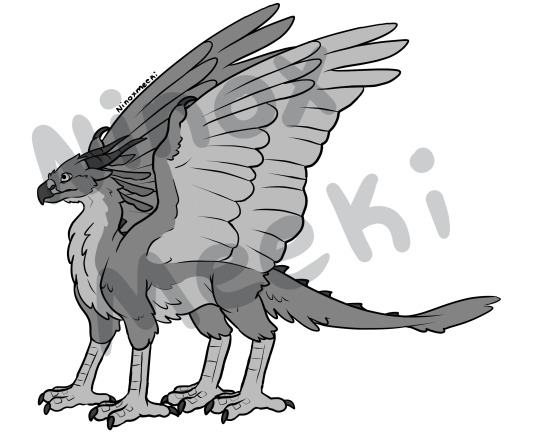
Digimon Card Template->
Hey guys, I finally finished the templates! A few words to read before using, and more words under the cut if you will. I'd love to see any and all cards you create, so feel free to leave me an ask or DM! Also if you feel like supporting me a little, feel free to stop by my ko-fi->
First off, all fonts you need for the template are in the "Card Template Fonts" rar file. Remember to install them first before opening the files. Second, I recommend working with the PSD file in Photoshop, if you can. It has more and easier customization. If you use CSP, do use the CSP files. The PSD Text layers don't work in CSP, as well as certain other settings. I did my best to adapt the file to CSP, and it should work fine!
The Files have "HELP" layers in certain folders, I recommend reading them! Some of the Information I will repeat under the cut.
HAVE FUN! I wanna see lotta cards!
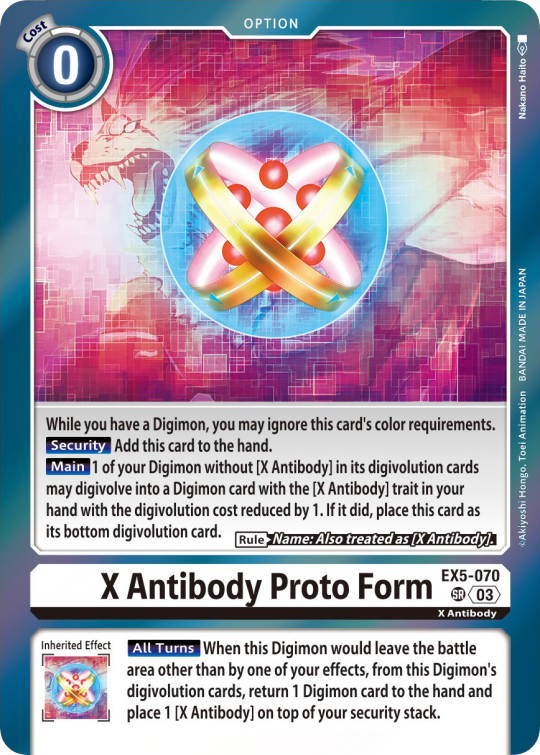
Okay, below the cut I'll leave some notes on how the Digimon cards are designed, as of the num <03> era at least.
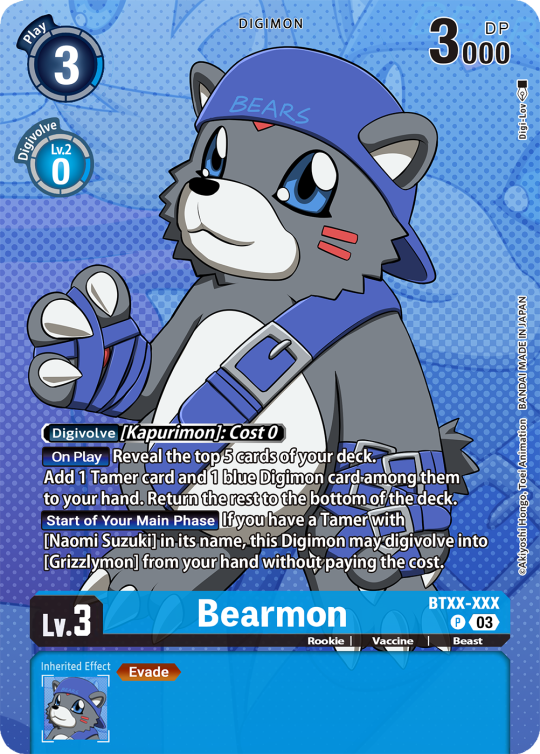
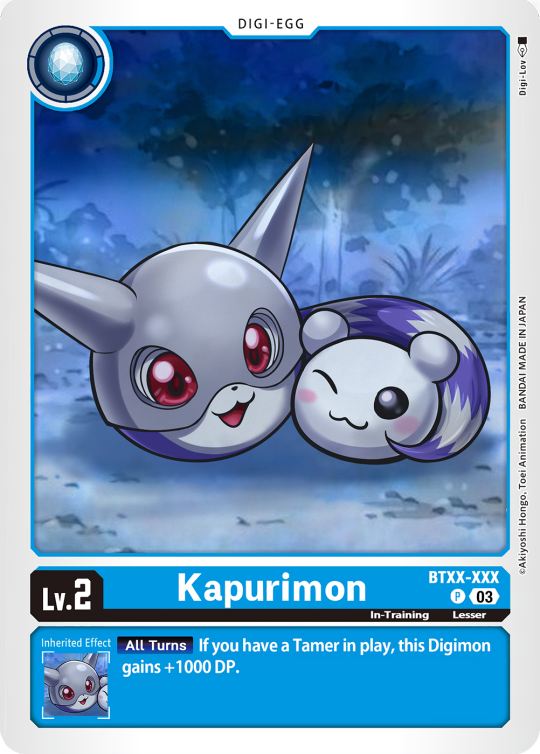
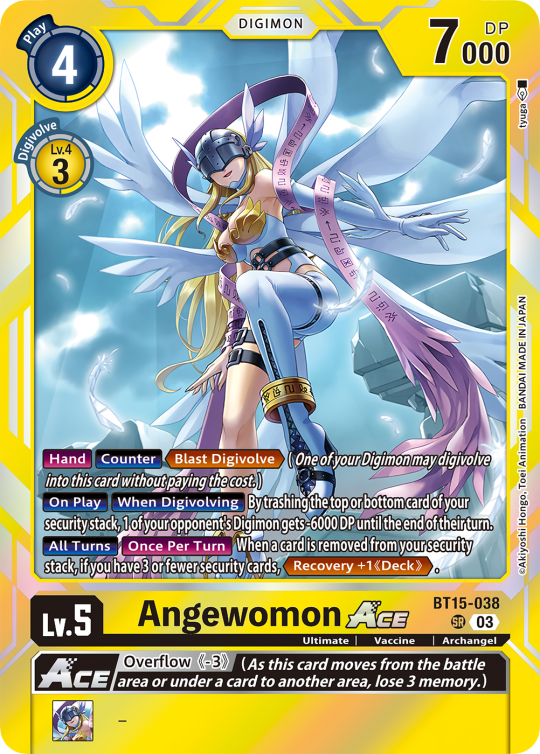
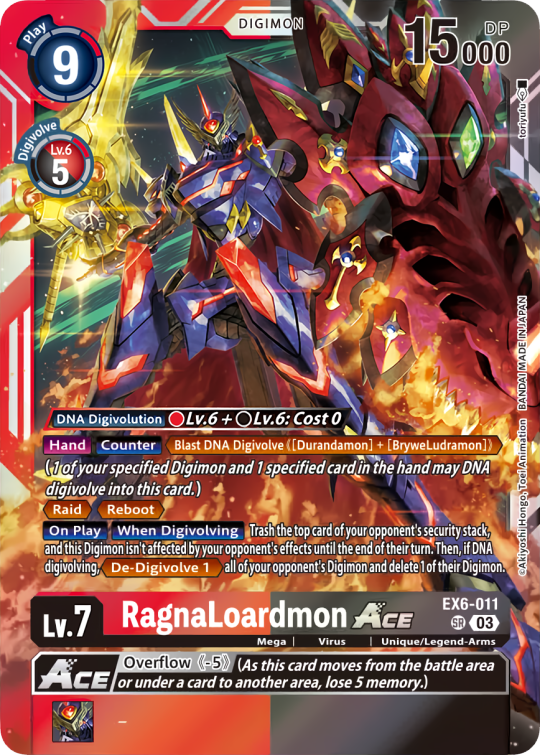
Digimon cards have seven different colors. Red, Blue, Green, Yellow, Black, Purple, and White. White cards are rare and reserved for special Digimon/Tamers, and usually don't interact with other colors. For easier reading, Yellow and White cards have black text in their colors, instead of the usual white text. On multicolored cards, card including Yellow (or white) have white text with a black outline. (before <03> if Yellow was the first color, the text was black with white outline instead, but they unified it with the update) The color on the left is considered the first color. Since the design update, the Card color is displayed in a color wheel around the Play cost. The digivolution cost bubble also recieved a color wheel, as well as the buble being split into the differen colors. Imagining it like a clock, the top color is the first, and then circling clockwise. Digi-Egg, or Lv.2 Digimon are always single color.
[tricolored cards have been introduced just recently and super rare. use sparingly]

Now to the Effects. The main effect is in white color with a black outline (also outlines on the keywords), while the Inherited Effect doesn't have outlines (unless it's a Yellow double color). If the Digimon has no Inherited Effect, there will be a small dash in the box.
Only white cards have black text in their main effect.
The effect text will start in the lower bottom of the image, not all the way at the bottom, and go down from there. If the Effect is too long it will move up.
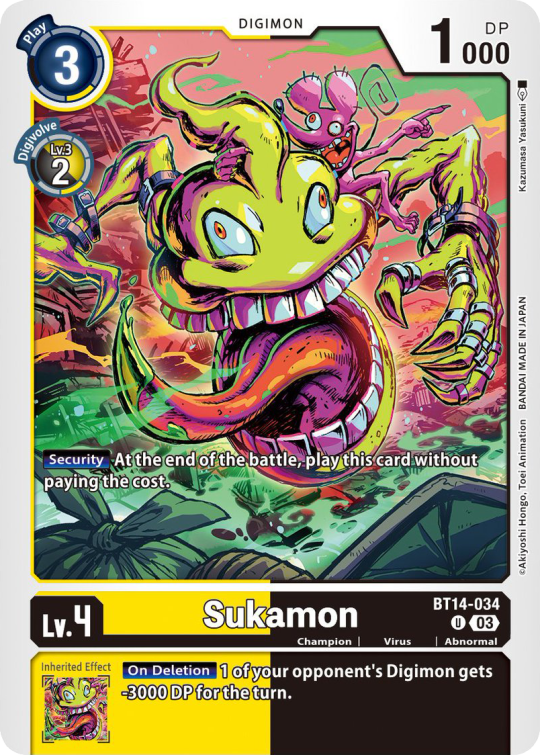

Besides the regular evolution requirements, Digimon may have special "Digivolve" rules in their effect. This can make an evolution from a specific digimon cheaper, allow X Antibody Digimon to evolve from their normal counterparts, serve to overlook color requirements, or to allow evolution from certain traits, etc.
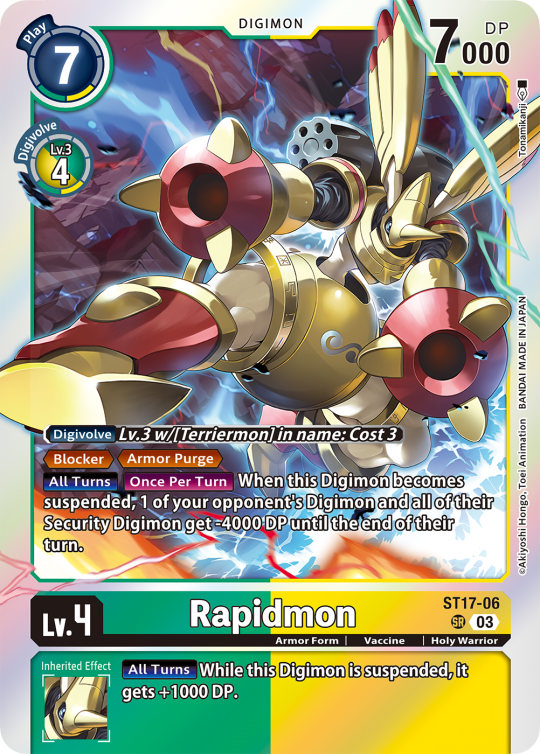
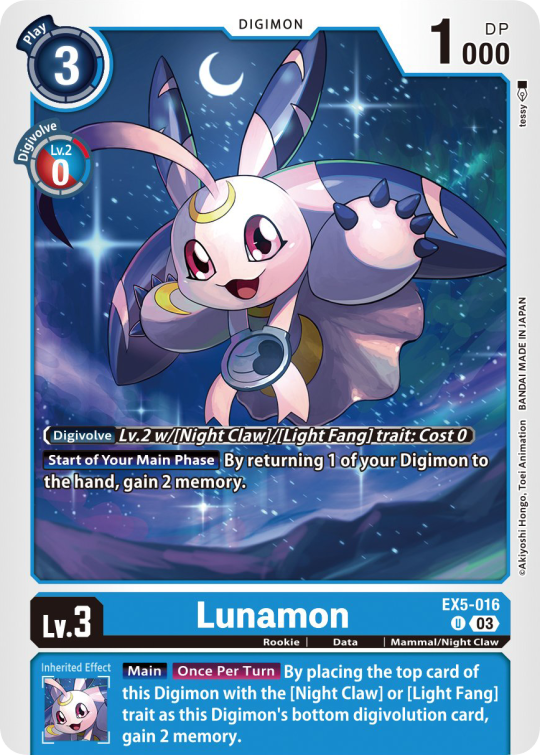

Some Digimon may also have an extra "Rule" in the bottom corner.
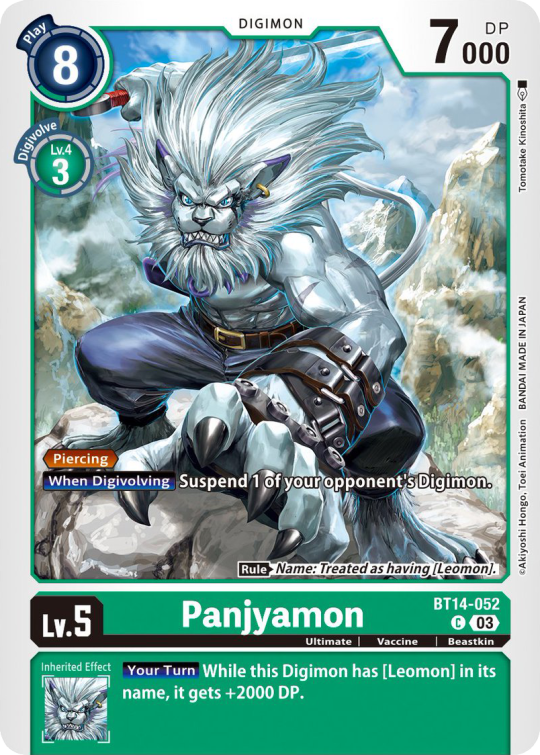
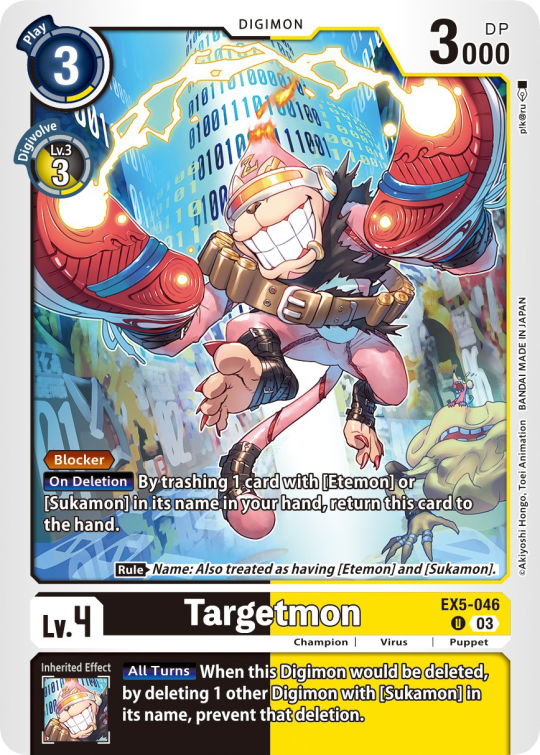

Ace Digimon will always have [Hand][Counter]<Blast Digivolve> effects. Most of them have no inherited effects. They also have a significantly cheaper play cost than comparable Digimon, but in turn have the Overflow mechanic. EX6 introduced Blast DNA Digivolution, which specifies the required Digimon by name, and not just Level and color.
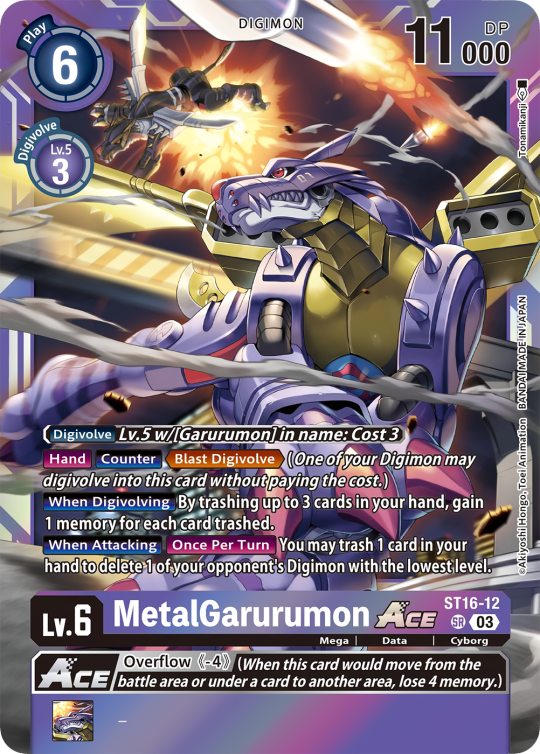
Lv.6 Digimon usually don't have inherited Effects, some might though, if they were made with Lv.7 evolution in mind. Furthermore Lv.6 Digimon pop out of their frame, even on the normal arts.


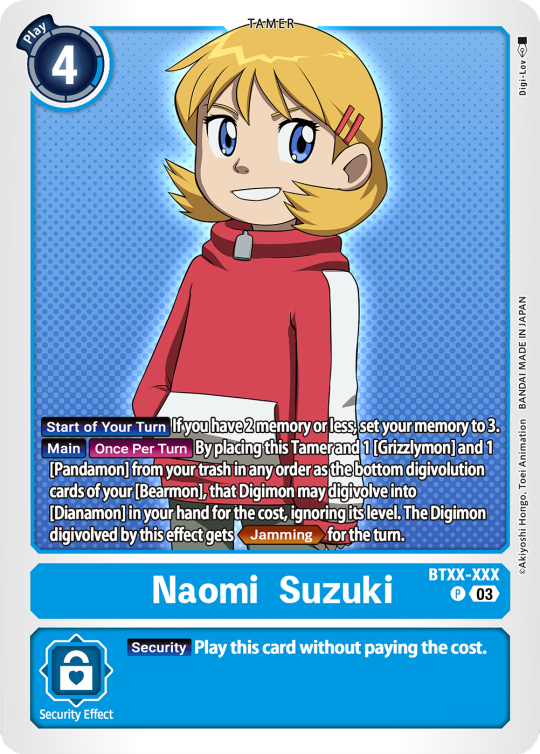
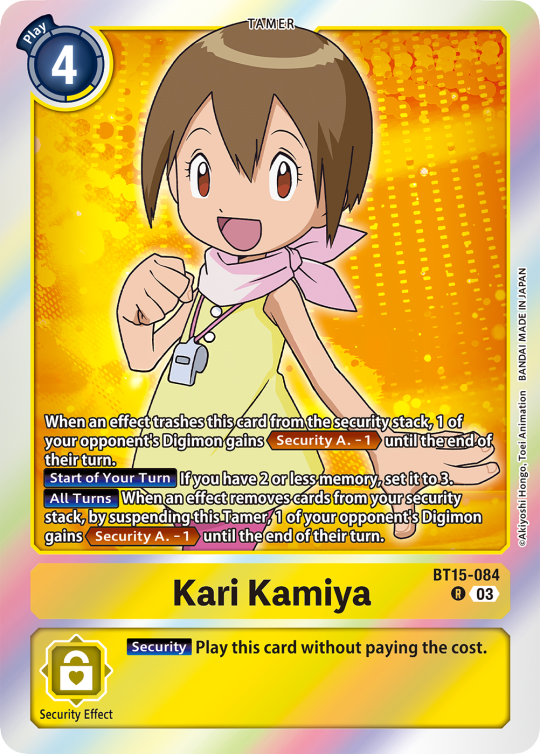
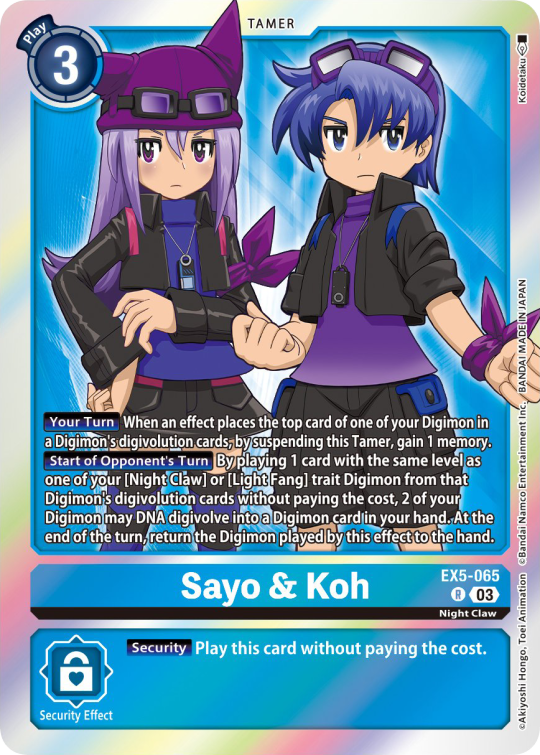
Now Tamers originally had neither traits, nor inheritence effects. But certain Tamers now do! Tamers with Mind Link effects, or the kids from Frontier for example, will have Inherited Effects.

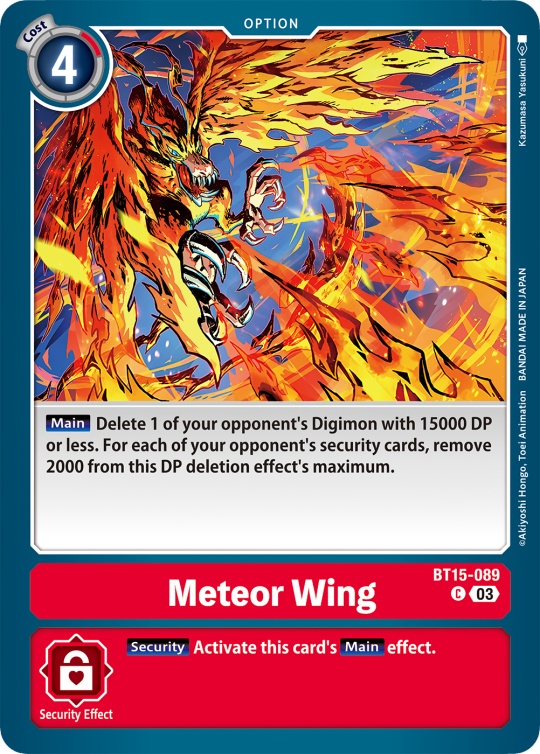
Option cards have a grey backdrop for their effects, and the effect text is black. This black effect text carries over to full/alt arts, regardless of color. The have a (use) cost instead of a play cost. They can also have traits or rules, but it is rare.

#digimon#digimon tcg#digimon card game#digica#digisafe#デジカ#digimon card#digimon template#template#digi community#digi lov edits
414 notes
·
View notes
Text
-Sweets' Graphic Commissions-
aka I'm a poor bitch in need of money.
This is to test the waters mostly but here's the gist: I am low income and on disability. I do have a job but they're currently giving me very little hours, if at all. If I'm lucky, I get at least 4 hours a week (to note: because I am on SSDI, I am allowed to work up to 20 hours per week and I'm not even getting that). I am currently looking for another job but like most things irl it's been a slow progress.
While I am able to pay the bills (Apartment, way overpriced Internet and a few other services), at the end of month money gets extremely tight where it's hard to buy groceries and other things that are needed to the point I'd have to go to my parents for extra funds. While they have no problem supporting me if necessary, I would like to not rely on them for money if it can be avoided
With these factors in play I thought it'd wouldn't hurt to attempt to open up graphic commissions for tumblr roleplay or whatever you wish to use it for. I may do art commissions in the future if this goes well plus once I figure out pricing for that but right now I'm keeping it at graphics.
Payment methods right now include Paypal, Venmo and Zella. I'm currently working on setting up a Ko-Fi but it isn't ready to go yet. All prices are USD.
General Disclaimer: I'd need examples of aesthetics and/or theme for me to work on your commission. I recommend sending me a moodboard or have a description ready. I can only work with what I'm given. With permission, I may use commission work as examples for product. I will not start on the project until payment is made. ALL GRAPHICS ARE FOR PERSONAL USE ONLY!!!
Services and prices under the cut:
Icon boarders - $15+

About: For roleplay tumblr blogs or anything else really. What you'll get: A zip file containing The PSD file with all it's layers along with directions (in a text file) of where to put your pictures for icons. Directions will also be put in the layers needed. You are allowed to make edits to the boarder as you see fit. Price starts at $15 but can go up to $20 depending on complexity and time needed. If you wish for me to add images on top of making the boarder this can be discussed but will cost extra due to the time it can take plus the number of icons you want. The icons will be provided within the same zip file.
More examples:


W/ pictures:


Banner(s) - $10+

About: For roleplay tumblr blogs or anything else really. What you'll get: A zip file containing the PNG file(s) and The PSD file(s) with all it's layers if you wish to do your own edits (color psds, changing text, etc). Price starts at $10 but can go up to $15-$20 depending on complexity and time needed. For each individual banner you wish me to slight edit the text/wording in will be $2 extra.
More Examples:

Dividers - $3

About: For roleplay tumblr blogs or anything else really. What you'll get: A zip file containing the PNG file(s) Base price is $3 but for anything more complex (example above being It was more than a basic image and editing) than the examples below will be higher.
More Example:


If there is something not listed here you'd like me to make (promos, other graphics, etc) we can discuses. This post will be updated with added/better examples or more services down the line and may even do bundles as well.
25 notes
·
View notes
Text
So uhm... I did a thing...
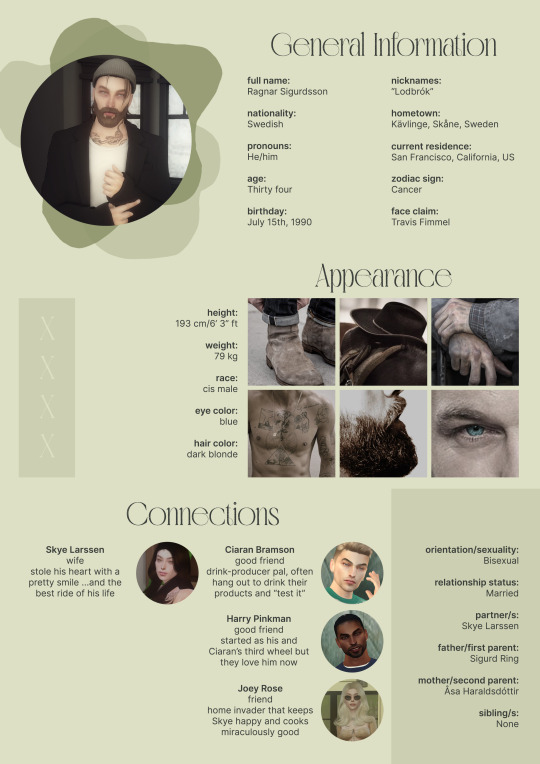
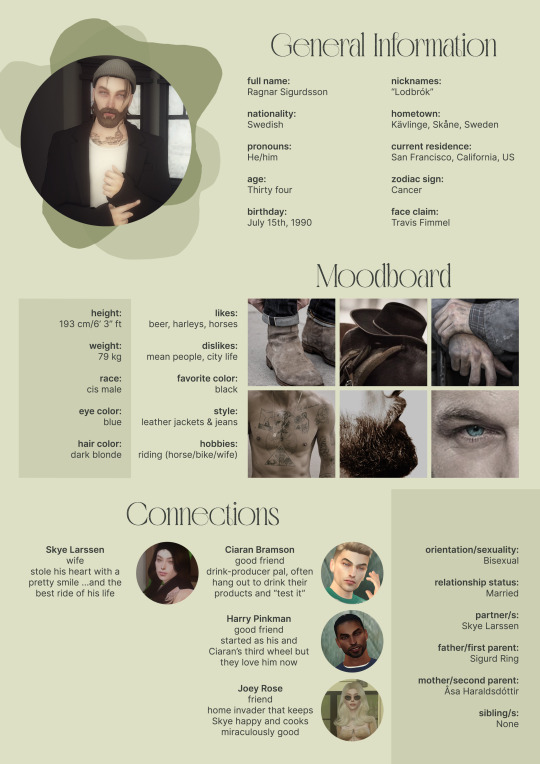
✨Character Info Template✨
UPDATE 11.24.24: this template now has a page theme version! if you're not a fan of templates, you can get the code to use it as an interactive multimuse page >here<
Been meaning to do this a long time ago (and actually started it but never finished it, lol) as a way to share some more information about my ocs without needing to use a custom page theme, but mostly because I haven't found any page theme that looks exactly as I want and allows this much customization.
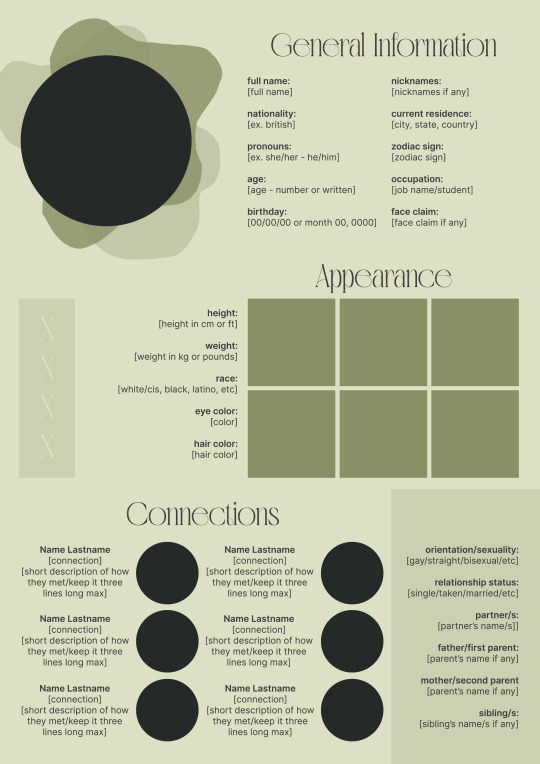
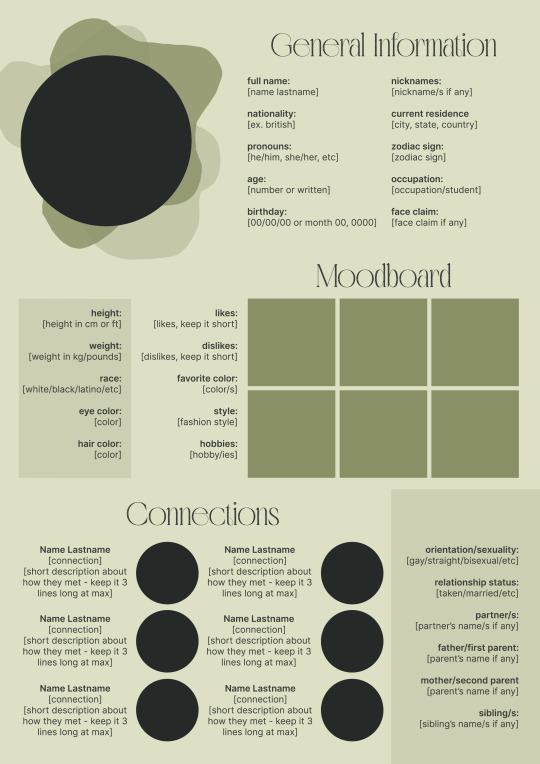
There are two versions and both are almost exactly the same; but the example shown in the left has an 'appearance' section which is small and has few quick facts regarding the oc's appearance; while the example on the right has a 'moodboard' section instead which allows you to add more info about your oc.
You can change every section/title to fit your needs like I did in the examples below; I personally removed some categories as well and got rid of some connections as this oc doesn't have that many close friends/partners to fill the original template. However, I also included an extra separated 'connections' section in the download in case you want to add more people and more information.
I recommend you stick to square-shaped pictures so it's easier to fit them to each section. Also if and when you edit the information or section titles, please select only one line at a time to replace it so you don't lose the text format. (Titles shouldn't change because that's a single format/font within the same text box, but should it change you can always hit ctrl+z hehe) When you're done, I strongly recommend you save this as a .png instead of .jpg so it's the best possible quality!
Last but not least, this is a .psd file. So you'll need either Photoshop (I did this with Photoshop Portable, but it supports newer versions of PS and it *should* support older versions too) or Photopea to open and edit this file.
Credits: Adobe Photoshop, Inter font, Golften Vintage font
>DOWNLOAD< (patreon but free :p)
(note: I'm posting this with my gaming blog because I think my fellow gamers might be interested in this, but please consider giving credits to me if you use this template by tagging @synindoodles instead of this blog)
More info on how to use and edit this template below the cut!
Layers:
>Each layer is properly named and categorized. The general layers such as the background, the icon shape and background shapes are under the groups.
>If you don't want to see/don't need one of the connections' pictures and information, I recommend you find which one it is (1, 2, 3, 4, 5 or 6) and click on the eye symbol next to the layer to hide it so that way if you ever need it, it won't be truly gone.
>To edit a text section, simply find the layer (such as General Information>Left Column) and double click on the 'T' symbol next to the layer. That way it will open edit mode and allow you to edit the text, just don't hit delete or enter while everything is selected or you'll erase it :p
>Main text sections aren't separated, they're blocks of text. I recommend you don't remove the amount (for example, if you downloaded the version with the 'appearance' section, which has 5 sections of information, don't remove the fifth line.) Either leave it empty or replace it with another data, otherwise it will look weird. The 'general information' section might look good even if you remove a few lines, just don't get rid of the whole block of text.
Pictures:
>To add a new picture, simply paste it over this document and move it using the Move Tool.
>To frame it (so it becomes a circle or fits over the shape you want), make sure the picture layer is over the layer you want, then while holding alt click between the two layers. [For example, if you want to add a new main oc picture: 1) paste the pic you want, 2) move it with the Move Tool so it's covering the big circle, 3) once you've fully covered the shape (if it isn't you can resize it by right clicking on it then on 'free transform', sometimes you might need to hold shift to proportionally resize it) make sure the newly pasted pic layer is over the layer named "picture goes here", 4) hold the alt key and hover your mouse cursor over the line between your pic layer and the circle layer until you see an arrow going down symbol, once you see it click it and tah dah! your picture should now have the same shape as the circle! - you can further move it if it doesn't fit the way you want with the Move Tool (;
Others:
>You can change every color, font and section to your liking, just don't change the general layout of the template.
>To hide/show the guides (those bright blue lines all over the document), click ctrl+,
>'Inter' is a free font and you can get it in the link above (linked with the credits), Golften Vintage is not, but you can get the demo version >here< (just scroll down and click the blue download button under license). I will not tell you how to install fonts as it might be different for everyone (for me it's C:/Windows/Fonts and I just drop the zipped files (except the .txt one) there), but google is your friend.
>I can't think of anything else that needs to be said here, but if you have any other question feel free to send me an ask or dm and I'll help you out!
>Last but not least, a like is appreciated if you plan to use this plus consider tagging @synindoodles if you use it <3
#psd template#template#characters page#muses page#muse page#muse template#character template#character page template#oc page#oc page template#synindoodles#rp resources#rp template#roleplay resources#roleplay template#writers resources#writing resources#writing template#writers template
214 notes
·
View notes
Text
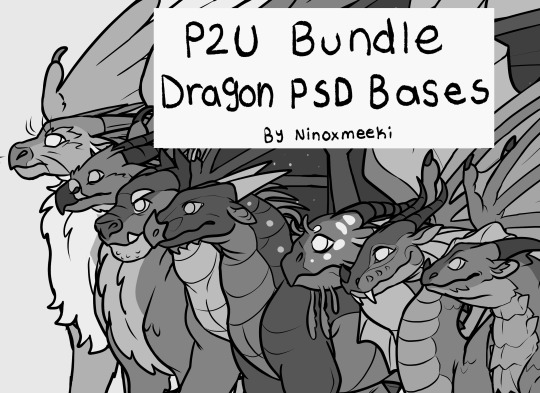
MAJOR UPDATE FOR MY SH0P!! I've added psd bases for all seven of the pyrrhian tribes based on refined versions of my tribe headcanons available for purchase. And if you buy the pack you get about 30% off the price compared to if you purchase them all one by one! You can get them here They all come with premade customizable features such as horns, eye shapes, coloring layers and markings. As well as tribe specific features for each such as frills, barbels, feathers, tails, fins, sails, and fur! Each of the item listings provide a couple colored examples to give you a feel what to expect. There's also free png template versions of these available as well but they don't include the color layers or extra features. If these do well and capture some people's interest, I might make the pantalan tribes as well.
Image Description in the alt text.
#wings of fire#wof#dragon#dragons#sandwing#skywing#rainwing#nightwing#wof nightwing#mudwing#icewing#seawing#wings of fire art#wof base#art base#art reference#art resource#dragon base#dragon art#wingsoffire#dragon design#wof art#pyrrhia
99 notes
·
View notes
Text

KPROFILES TEMPLATE PSD
A mockup I made from scrap inspired by kprofiles.com for the recent character update event, as well as for anyone in general in the LGC community to use! ( Let's just say I got really inspired... ) These are highly customizable. Heads up that much of the font used in the logos is downloaded. I recommend using the Rasterize Type function (right click on the layer), then using Blending Options to do a Color Overlay if you would like to change the colors of the text in the header. The rest of the text is simple Arial and all other colors are changeable. I am also willing to help out if there are any questions!
DOWNLOAD THE PSD * Please provide a credit link in the original post if you decide to use. Especially if you decide to use it outside of LGC.
36 notes
·
View notes
Text
Magma event details!
Please check the rules below if you plan on joining our events!
A few words about Magma for newcomers:
Magma is a free browser based art program where participants can collaborate and draw on the same canvas at the same time! Magma works on both PC and mobile devices! Magma has most useful art program tools! But some are a little difficult to find, like layer opacity lock. You can export the images as PNGs and PSDs so you can save and keep all your layers etc.!
Hosting a session is easy! Set up a new canvas and share the link and that's it, you can start drawing. You can do public sessions like mine, or private sessions just with your close group. Update!! Previously you were able to use Magma anonymously without making an account, but this option does not exist anymore.
Our Magma event rules
Have fun! These events are meant to get you inspired, get to know other artists and create awesome art and ideas together!
Everyone is welcome to join my sessions! Doesn't matter where or when you join. You don't need to draw anything there, you can also just come and chat with us and watch others do their magic! Lurking is totally fine too!
Avoid drawing too big! Make sure to leave enough space for other people's drawings! Mind that there are 40-80 people partaking in these weekend events! (Max. 1/6th of the canvas per drawing is ideal!) We recommend to zoom in at 100-150% before you start drawing to avoid this. However! If you have an idea that others can contribute to, I'd be excited to hear it!! Those are highly appreciated!
Avoid drawing over the canvas frames!This is for possible future use in i.e. collages & personal aesthetics. They are there for a reason.
Keep it PG!
You are allowed to paste reference images in the session to use as a base etc.! Please remove them when you don't need them anymore and make sure not to cover areas where others are currently drawing!
When you are finished with your piece, please flatten your layers! The Magma total layer limit is 60 layers per canvas and it gets full rather fast. We have set a 8 layer limit per user/canvas. (If you have used layer effects in your piece, start flattening from bottom to top so they get preserved correctly!)
If you want to post/share Magma art that features other artists' works, you must ask for their permission first! This is very important!! Simple blur/solid color to hide them is ok, otherwise editing other people's art is not!
If you need more time to finish your piece, please let me know as soon as possible! If you know you aren't going to finish yours, please release the space for others to use!
Don't hesitate to ask anything! We are very happy to help out make the most of your session! Our regulars are all friendly and helpful, and my co-admin and mods are able to assist with i.e. getting your layers back!
Other tips!
Some users have experienced disasters losing layers for good by pressing CTRL + X, we recommend avoiding that for now!
Save regularly! Magma is a server based program so it's not as stable as your usual art programs, and also when the program refreshes you might lose some of your progress. Better saved than sorry! You can export the whole canvas as PNG, JPG & PSD!
You can have up to two Magma sessions open in your browser at once!
If you log out of the session you might lose rights to your layers. Please ask either the admin or approved users to give your layers back to you!
If Magma is going slow for you, it may be fixed by turning off the graphics accelerator. Go to Edit > Settings > Turn off Graphics Accelerator.
Merge layers with layer effects starting from bottom to top! For some reason Magma messes them up easily otherwise and the results will not look like you want.
Magma has a text chat we love to hang out in, it's of course optional but we would be happy to have you there!
You can send private messages to others by being on the same canvas with the receiver and clicking their icon!
Magma also has a voice call option. We prefer not to use it, but it's easy to misclick the button! Don't be alarmed!
We're continually figuring out new features and bugs in each session, I want to note down all of them to make the sessions as smooth and fun for you as possible! Let us know if you have any issues!
Also something notable: it's always well appreciated if you draw official Pokémon characters! Most of my followers are into submas or Pokémon in general so as the host I'd like to offer content most would enjoy! Some events welcome OCs but the free doodle session will always stay open for your characters!
After everyone is done I start post-processing the images. It may take a while until they are ready to be posted, please be patient! I will post the art on both my Twitter and Tumblr. You can use #jun's magma events for tagging your posts!
See you in our next event!! All aboard! <3

82 notes
·
View notes
Text
Highlights
Need to tweak a filter you applied hours ago? New in GIMP 3.0 is non-destructive editing for most commonly-used filters. See the changes in real time with on-canvas preview.
Exchange files with more applications, including BC7 DDS files as well as better PSD export and many new formats.
Don’t know how big to make your drawing? Simply set your paint tool to expand layers automatically as needed.
Making pro-quality text got easier, too. Style your text, apply outlines, shadows, bevels, and more, and you can still edit your text, change font and size, and even tweak the style settings.
Organizing your layers has become much easier with the ability to select multiple items at once, move them or transform them all together!
Color Management was again improved, as our long-term project to make GIMP an advanced image editor for all usages.
Updated graphical toolkit (GTK3) for modern desktop usage.
New Wilber logo!
0 notes
Text
The Role of Clipping Path Services in E-commerce Success
The competitive nature of today’s online retail world requires high-quality visuals to determine the success of any e-commerce store. High-resolution images attract potential customers, showcase products effectively, and establish strong brand credibility. Clipping path services provide a crucial image editing solution that enhances product presentation and ensures professional, visually appealing images.

Importance of Visuals in E-commerce
Product images serve as the first point of interaction between customers and online products. Research shows that over three-quarters of online consumers rely on product images to decide whether to purchase a product. Poor-quality images can repel potential customers and damage brand reliability.
Why High-Quality Visuals Matter in E-commerce:
First Impressions Matter: High-quality edits in product images immediately grab the attention of online shoppers.
Boosts Conversions: Professionally edited images enhance buyer trust, resulting in higher sales.
Consistent Branding: Clean and consistent visual elements help establish a strong brand identity.
Better SEO Performance: Optimized images with precise alt-text improve search engine rankings.
What is a Clipping Path?
A clipping path is a technique used in photo editing to isolate an object from its background. Software like Adobe Photoshop allows editors to create a precise path around the subject using the Pen Tool. Once the path is completed, the subject can be placed on a different background or used independently for marketing campaigns.
Types of Clipping Path Services:
Basic Clipping Path: Used for simple shapes with minimal curves, such as boxes and books.
Complex Clipping Path: Suitable for intricate designs, such as jewelry pieces, hair strands, and layered products.
Multi-Path Clipping: Enables color adjustments and the editing of specific sections of an image.
Importance of Clipping Path Services in E-commerce
E-commerce businesses gain multiple advantages by utilizing professional clipping path services.
Enhanced Product Presentation
A clutter-free background gives products a polished, professional appearance, increasing their aesthetic value.
Consistency Across Platforms
E-commerce platforms like Amazon, eBay, and Shopify require standardized product images. Professional clipping path services ensure uniformity across different sales channels.
Saves Time and Resources
Outsourcing image editing allows business owners to focus on core operations such as marketing, customer service, and sales.
Increases Customer Engagement
Customers are more likely to browse longer and make purchases when presented with high-quality product images.
Better Adaptability for Marketing
Isolated product images can be placed on various backgrounds for promotions, making them highly versatile.
Choosing the Right Clipping Path Company
Selecting a reliable clipping path service provider is crucial for e-commerce success. Here are key factors to consider:
Experience and Expertise: Choose a provider with substantial experience in e-commerce image editing and a strong portfolio.
Quality Assurance: Ensure the company delivers top-quality image editing with attention to detail.
Turnaround Time: Businesses requiring frequent updates need fast and reliable services.
Customer Support: Prompt responses from the support team ensure smooth collaboration.
Data Security: Protecting product images from misuse is essential.
Key Features of a Reliable Clipping Path Service
A professional clipping path company should offer:
High-Quality Image Editing: Ensuring perfect precision for an improved product appearance.
Bulk Order Capability: Efficiently handling large volumes of images.
Affordable Pricing: Competitive pricing without compromising quality.
Multiple File Format Support: Delivering images in various formats like PNG, JPEG, PSD, and TIFF.
Advanced Editing Options: Additional services such as shadow creation service, color correction, and photo retouching service.
Cost Considerations for Clipping Path Services
The cost of clipping path services varies based on several factors:
Complexity of the Image: Simple objects require less effort and cost than intricate products like jewelry and apparel.
Number of Images: Bulk orders often receive discounts.
Turnaround Time: Urgent requests may come with higher pricing.
Comparing multiple providers helps businesses find a service that meets their budget and quality expectations.
Case Studies: Success Stories in E-commerce
Case Study 1: A Fashion Retailer’s Growth
A UK-based fashion retailer experienced a 40% increase in sales after using professional clipping path services. Improved product images led to higher engagement and conversion rates.
Case Study 2: An Electronics Store’s Brand Enhancement
An electronics store achieved improved brand consistency through uniform backgrounds and precise image editing, leading to enhanced customer trust and repeat business.
Tips for Effective Collaboration with Designers
To achieve the best results from a clipping path service provider, follow these collaboration tips:
Provide Clear Instructions: Specify background color preferences, file format requirements, and image resolution.
Share Reference Images: Examples help designers understand the desired outcome.
Communicate Regularly: Stay in touch to monitor progress and address concerns promptly.
Use Feedback Loops: Review initial edits and provide feedback for necessary adjustments.
Elevate Your E-commerce Brand with UK Clipping Path
Professional clipping path services significantly enhance an e-commerce brand’s reputation. High-quality product visuals not only make products more attractive but also build customer trust and credibility.
Why Choose UK Clipping Path?

UK Clipping Path is a trusted provider of high-quality clipping path services tailored for e-commerce businesses. Our experienced design team uses advanced technology to ensure top-tier image editing.
Precision Editing: Our experts create flawless clipping paths for superior product visuals.
Fast Turnaround: We deliver high-quality images quickly without compromising standards.
Affordable Pricing: We offer budget-friendly services suitable for businesses of all sizes.
24/7 Support: Our dedicated support team is available round the clock to assist you.
Start Your E-commerce Success Journey Today!
UK Clipping Path offers top-tier background removal, color correction, and advanced professional photo editing. Elevate your online store’s visuals today—contact us now!
0 notes
Text
Alabama Driver’s License (Front & Back) PSD Template (V2)
https://psdpack.shop/?p=1595 Alabama Driver’s License (Front & Back) PSD Template (V2) https://psdpack.shop/?p=1595 Are you looking for a high-quality Alabama Driver’s License template? PSDPack.shop offers a premium Alabama Driver’s License (Front & Back) Template (V2) in PSD format, available for just $12. You can purchase it securely using Bitcoin (BTC) or a credit/debit card. Why Choose Our Alabama Driver’s License Template? ✅ Fully Editable PSD Format Our Alabama Driver’s License template is designed in Adobe Photoshop (PSD format), ensuring 100% customization. You can modify text, fonts, images, and colors to match your requirements easily. ✅ High-Quality Design This template replicates the latest Alabama Driver’s License design with precise details on both front and back sides. The V2 version offers improved accuracy, making it one of the best templates available online. ✅ Layered & Organized Each element in the PSD file is arranged in separate layers, making it simple for users to edit and update details without hassle. ✅ Instant Download & Secure Payment Once you complete the purchase, you will receive an instant download link. Payments can be made through Bitcoin (BTC) or credit/debit card, ensuring fast and secure transactions. Features of Alabama Driver’s License Template (V2) Feature Description File Format Fully editable PSD file Front & Back Both sides of the Alabama Driver’s License included Customizable Fields Name, address, license number, date of birth, and more Font & Color Matching Matches the official license for a professional look Instant Download Available immediately after purchase Payment Options BTC & Credit/Debit Cards How to Use the Alabama Driver’s License Template? Download the PSD File – After purchasing, you’ll receive a direct link to download the template. Open with Adobe Photoshop – Use Photoshop to edit all text layers and elements. Customize Details – Modify name, address, license number, and other fields as required. Save & Print – Save the edited file and print as needed. ⚠️ Disclaimer: This template is for educational and novelty purposes only. Misuse of this file for illegal activities is strictly prohibited. Why Buy from PSDPack.shop? Trusted Seller: PSDPack.shop is a reputable platform for high-quality editable templates. Affordable Price: Only $12 for a professional Alabama Driver’s License PSD. Secure Payment Options: Pay via Bitcoin (BTC) or Credit/Debit Card safely. Customer Support: Get assistance if you face any issues with your download. How to Purchase? Visit PSDPack.shop. Find the Alabama Driver’s License (Front & Back) Template (V2). Click Add to Cart and proceed to checkout. Choose your payment method (BTC or Credit/Debit Card). Download the file instantly after payment confirmation. Get your Alabama Driver’s License Template (V2) today for just $12 and enjoy the convenience of a fully editable PSD file! 📌 Buy Now: Download Alabama Driver’s License Template (V2) – PSDPack.shop
0 notes
Text
‘ * temp rules ( this was an impulse, i haven’t made a carrd . )
howdy ! jayne, queer, they/them pronouns. i’ve been on tumblr for a very long time, so i know the drill by now ! this blog is semi-active at best, i will write when i have time / muse. this blog is selective, i will only write with mutuals ( i follow you / you follow me ) i may not follow back right away as i get busy and i try my best to read everyone’s rules before i follow !
i have no affiliation with marvel / disney, this blog is for entertainment purposes only, the only thing i own are my headcanons / canon divergences, my writing and my edits. the current psd used on this blog belongs to me.
i am cherry-picking canon, a lot of my portrayal is based off of headcanons, with canon layered on top.
racism, sexism, homophobia, xenophobia, and all other forms of bigotry will not be tolerated on this blog. the mun is queer and neurodivergent, as is the muse. i will be very liberal with the block button. i ask you to keep yourself safe, and if you are uncomfortable reaching out, you do the same. rp is for fun so let’s all be kind.
triggering content will be tagged #[trigger] //. nsfw will appear in the form of headcanons and possibly threads, and will be tagged #explicit // . if you are under 18, do not interact with explicit content on my blog.
i love shipping and am almost always open to it if our muses have chemistry, i will never force ship however if you write rio feel free to come discuss dynamics or simply jump into tormenting her. agatha is a lesbian.
i do practice mains / exclusives / affiliates. if you have questions about this, please let me know !
i use small text & icons with a cluttered border, i also tend to double / triple space before and after dialogue. if any of my formatting makes it hard for you to see, don’t hesitate to let me know ! you are never expected to match formatting or length in replies. ( i tend to write para to multipara, and stay away from one liners though i am not opposed to shorter threads ! )
this blog is a wip so please be patient while i get my carrd set up ! 💕✨ feel free to come to me with any questions or concerns. rules are subject to change, and will be updated frequently (with warning.)
LAST UPDATED 10/31/24
0 notes
Text
Photopea - Free Photo Editing Software
Photopea is a powerful online image editor designed to provide an Adobe Photoshop-like image editing experience. It is suitable for a variety of image editing tasks, including photo retouching, graphic design, and web design. Due to its seamless cross-platform support and no installation required, Photopea has become the tool of choice for many designers and photographers. https://youtu.be/E2kMCYEvthE?si=Lx9myKqa0mewD1rz Advantages: Cross-platform: Since it is browser-based, it can be used on any operating system, including Windows, Mac, Linux, and Chrome OS. Cost-effective: Photopea offers a free version, but also has paid subscription options that provide advanced features and an ad-free experience. No installation required: Users do not need to download or install any software, just visit Photopea.com to use it. High compatibility: The ability to open and save a variety of file formats makes it an ideal tool for working with a variety of image files. Multiple file formats supported: Photopea supports multiple file formats, including PSD (Photoshop documents), XD, Sketch, PDF, XCF (GIMP documents), RAW, JPG, PNG, GIF, SVG, etc. Photopea provides a powerful template feature that enables users to create and edit images, designs, and documents more efficiently. These templates can be used for a variety of purposes, including social media images, advertising materials, business cards, posters, web design, etc. Here are the key points of Photopea's template feature: Preset Templates: Photopea provides a variety of preset templates, including standard sizes for social media covers, advertising sizes, print sizes, etc. Users can select the desired template when opening a new file to start working quickly. Custom Templates: Users can create and save custom templates according to their needs. Custom templates can include specific layouts, layer styles, text styles, etc., which are convenient for users to reuse in different projects. Multiple Categories: Templates cover a variety of categories and uses, such as: Social Media: such as Facebook covers, Instagram ads, etc. Advertising Materials: such as banner ads, card ads, etc. Printed Materials: such as business cards, flyers, posters, etc. Web Design: such as web headers, button designs, etc. Quick Editing: Users can quickly edit based on the template to modify text content, replace images, adjust colors, etc. This makes the design process more efficient, especially for projects that need to update content frequently. Photopea | Online Photo Editor Read the full article
0 notes
Text
Adobe Photoshop Course Training in Jaipur
Adobe Photoshop is a widely used graphics editing software developed by Adobe Inc. It's known for its extensive capabilities in image manipulation, graphic design, and digital art creation. Here are some key points about Adobe Photoshop:
Image Editing: Photoshop allows users to edit and enhance images in various ways. You can adjust colors, brightness, contrast, and apply filters to achieve different visual effects. IT Desk is one of the best Adobe Photoshop Course Training in Jaipur. Our experts are ready to offer Photoshop Training in Jaipur by industry Expert.
Layers: One of Photoshop's most powerful features is its support for layers. Each layer can contain different elements of an image, and they can be edited independently. This allows for precise control over complex compositions.
Selection Tools: Photoshop provides various selection tools to isolate specific parts of an image. This allows you to edit or apply effects only to the selected area.
Retouching and Restoration: Photoshop is commonly used for retouching photos. You can remove blemishes, wrinkles, and other imperfections, as well as restore old or damaged photographs.
Text and Typography: The software enables you to add and manipulate text in your images. You can apply various fonts, sizes, and styles to create unique typographic designs.
Drawing and Painting: Photoshop includes a wide range of brushes and tools for digital drawing and painting. Artists can create digital art, illustrations, and concept designs using these tools.
Filters and Effects: Photoshop offers a plethora of filters and effects that can dramatically alter the appearance of an image. This includes blurs, distortions, artistic effects, and more.
3D and Animation: While primarily known for image editing, Photoshop also has limited support for 3D modeling and animation. You can create 3D text, objects, and even basic animations.
Integration with Adobe Creative Cloud: Photoshop is part of the Adobe Creative Cloud suite, which provides seamless integration with other Adobe software like Illustrator, InDesign, and Premiere Pro.
Plugins and Extensions: Adobe Photoshop supports plugins and extensions that can extend its functionality. These can range from simple automation scripts to complex image processing tools.
File Formats: Photoshop supports various file formats, including PSD (its native format), JPEG, PNG, GIF, and more. It's common to use PSD files for preserving layers and editing capabilities.
Learning Curve: Due to its extensive features, Photoshop has a learning curve, especially for newcomers. There are many tutorials and resources available online to help users learn and master its tools.
Commercial and Creative Use: Photoshop is used in a wide range of industries, from photography and graphic design to advertising and web development. It's a versatile tool for both professional and creative endeavors.
Adobe Photoshop is continually evolving, so make sure to stay updated with the latest versions and features if you're using it for your projects.
0 notes
Text

Slovakia passport editable PSDs, scan and photo-realistic snapshot, 2 in 1
Slovakia passport template two in one with editable PSD photo look. This template is fully customizable and compatible with Adobe Photoshop.
Download
In the download package you will find: ○ photo look and scan as PSD-files ○ free fonts used ○ organized layers ○ smart objects for changing photos ○ fully editable and customizable
You can also visit our mirror sites – www.gotempl.cc or www.shotempl.cc Browse through our passport templates – pick one and easily customize the file with your own text, images and more as you wish. Our website is updated on a daily basis so you can find the newest design templates.
If you have any questions or would like a custom-designed template, please contact us, we will be happy to help you! email – [email protected] or [email protected] telegram – @axtempl or @datempl
0 notes
Text

UPDATED APRIL 2025 (previous version | oldest version)
the links broke again so this time we're trying the tumblr image links and hope they don't spontaneously break (as has been known to happen) 🤞
Are you frustrated you can't leave second kudos on AO3? or third kudos? or whatever-who's-counting kudos?
Well, have I got the html for you!
Plop any of the codes in a comment (by copy&pasting the code under Keep reading - scroll to the bottom of the post) to make an author's day and show your appreciation!


bonus: cookie kudos
SCROLL DOWN TO GET THE CODES (under the cut)!
Feel free to spread and use these as much as you like, however you like!
[ if you enjoy them, consider supporting my ko-fi ]

I've received a lot of good suggestions for more variants but can't keep up with them all, so here are some resources to make it easier to make your own.
PSD for easily editable text (there is a color fill layer for adding a bit of white where the stroke doesn't cover small holes. I recommend cropping excess empty space out before exporting as PNG)
and here are PNGs of the kudos button for any other editing needs, with and without white stroke:


Use your favorite image host, copy the direct image link, insert it between the quotation marks in the code, add alt text, and you're ready!
<img src="[DIRECT IMAGE LINK]" alt="[ALT TEXT]">
(you can add any image or gif to a comment like this as long as you have the direct image link btw)
if you post your kudos images, I'd be grateful if you'd link back to this post so other people can find the resources too 💗

When you paste into the AO3 comment box, make sure the quotation marks are straight:

NOT curly:

simply deleting and re-typing them in the ao3 comment box should fix this!
Many of the old image links from the original post are broken. I cannot fix them. Please use the new codes going forward ❤️

Second kudos: <img src="https://64.media.tumblr.com/7a59d6a32ace63cdcce3911d529f8b88/08d1854086a423d0-e6/s250x400/3e75997487cf31a3ddd8d9314e78d3d63985ec7d.png" alt="second kudos">
Third kudos: <img src="https://64.media.tumblr.com/867894b77aae146acc60c681d556e02f/08d1854086a423d0-16/s250x400/83741777e69d723c92497dbc8909c1989bcfd8ac.png" alt="third kudos">
Chapter kudos: <img src="https://64.media.tumblr.com/6fc1963ea7479549f0ca0a924ab60ba3/08d1854086a423d0-34/s250x400/62891a8c3fb7ea15495684c732869ac20a61a6ba.png" alt="Chapter kudos">
nth kudos: <img src="https://64.media.tumblr.com/707e9d24c05e2e894475bb43c2018be3/08d1854086a423d0-06/s250x400/27e73cb1fb9483a6e1993d912ca95d6f0cbe8d04.png" alt="nth kudos">
yet another kudos: <img src="https://64.media.tumblr.com/05ec40eaf2f6948ddcfd58e7b3f6289f/08d1854086a423d0-4a/s250x400/30f9e4560583a7e145ba9869c1650ee79cd989eb.png" alt="yet another kudos">
ALL the kudos: <img src="https://64.media.tumblr.com/ae814ede90f2637ce1e58decbe783dc1/08d1854086a423d0-1e/s250x400/c52bf3d8f978b90f9fa00fee6d748fab31ba74d2.png" alt="ALL the kudos">
elevenses kudos: <img src="https://64.media.tumblr.com/36bd7c053e5763e184172cd8d2cf8c87/08d1854086a423d0-21/s250x400/a7b056f3d89e6738d7760cf81b740ef4bd45b7ca.png" alt="elevenses kudos">
Heaps of kudos: <img src="https://64.media.tumblr.com/79486036ed102d1d6bbdcfdde40cfce0/08d1854086a423d0-97/s250x400/562c7913b5c04a0be3ae88aefb0c7b52a677de98.png" alt="Heaps of kudos">
Kisses your forehead kudos: <img src="https://64.media.tumblr.com/59d6eef76163bef189aab485c889d938/08d1854086a423d0-f7/s250x400/9afad07e80307757b08a752ae93d0ca30bd75f13.png" alt="Kisses your forehead kudos">
Reading in public kudos: <img src="https://64.media.tumblr.com/2c2ef21138ac15cd86c940e18f026f18/08d1854086a423d0-9e/s250x400/1089607ba50414159c44322a09159017251b34db.png" alt="Reading in public kudos">
re-read kudos: <img src="https://64.media.tumblr.com/43eca1b71cd5af22991409073f73edd0/08d1854086a423d0-0d/s250x400/18f0392fd08faa883579e3839a143df37b8807d3.png" alt="re-read kudos">
This is the sole reason my sleep schedule is being ruined kudos: <img src="https://64.media.tumblr.com/b6c7385c4b2a18d2bdd7b2f7809f7679/08d1854086a423d0-96/s250x400/34d3bdd8263439d9ebff3a630c4ff785221da2d2.png" alt="This is the sole reason my sleep schedule is being ruined kudos">
Should be sleeping kudos: <img src="https://64.media.tumblr.com/fc26ea389c37ea36f7842bc7b9af0ddf/08d1854086a423d0-61/s100x200/f0959d6bfc6e5c7ced8e95bd4732a175f1b153a1.png" alt="Should be sleeping kudos">
Should be working kudos: <img src="https://64.media.tumblr.com/960404eda62b6161dfc5293ffbd60067/08d1854086a423d0-16/s250x400/1285e4b0e3a224a697ed7e2361ceeae383b297b3.png" alt="Should be working kudos">
Read the whole fic in one go kudos: <img src="https://64.media.tumblr.com/dcc0ff353b88330dcc32d0ce42126472/08d1854086a423d0-c7/s250x400/fe64765f47a12175372d9bbc69897c03b90e173a.png" alt="Read the whole fic in one go kudos">
Ungodly hour kudos: <img src="https://64.media.tumblr.com/0da03e4644c7b5bd068c7a5110538c3e/08d1854086a423d0-0d/s250x400/ff1fc66bfd0f927347ba887a063d01abc18a2531.png" alt="Ungodly hour kudos">
what about elevenses kudos: <img src="https://64.media.tumblr.com/33235fdbdca4deb1f0332efe25278473/08d1854086a423d0-41/s250x400/3790c6b7c260468371f54c5d30194b07941ecbb2.png" alt="what about elevenses kudos">
You've already left kudos here!: <img src="https://64.media.tumblr.com/3d7f5de5f16d1740360d9b264fc31d46/08d1854086a423d0-ae/s250x400/bdbfed76d384df20c1b8972f99de791e172c5c4b.png" alt="You've already left kudos here!">
You have already left kudos here. :) (red AO3 box): <img src="https://64.media.tumblr.com/f3ab87c7fa67958f45798af8f83fef41/08d1854086a423d0-27/s500x750/978088884e0431616ff413f1401706617cf5c447.png" alt="You have already left kudos here. :)">
Other links
answered asks about broken kudos links
all answered asks/fulfilled requests/misc related to this post
#fanfic#ao3#fanfiction#kudos#never expected this to blow up in the first place but i'm so happy to hear people using them and receiving them!!
114K notes
·
View notes
Text
Tidy CAS 2.2 - CAS category organizers

Last update: Version 2.2, Game version 1.113.291 / March 10, 2025
How does it work?
This CC creates basically an empty CAS item with the whole purpose to mark when a new category starts. This can be useful if you have a lot of skin details for example and don't know which ones work together as EA has not separated the parts (e.g. forehead crease, freckles) into separate categories. This CC is not meant to be applied to a Sim and has no texture or model.
Original idea by @sparrowcc
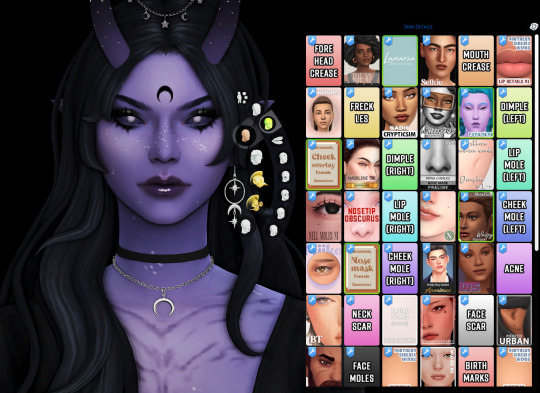

BGC
Categories: Earrings + piercings, head skin details, occult cheek scars, body scars, body accessories, body skin details, body medical weareables
Available for all ages, genders and occults
Comes in a lot of different colors
Known issue: Does not show up before EA pack items in left brow ring, left arm scar, left wrist , left index finger, tattoo left lower arm. Please only contact me about it if you have an actual solution.
Photoshop file to create your own!

Download + TOU
Do not re-upload the original
If you want to upload your modified version, please credit me
Do not claim as your own
「✦ Simfileshare ✦」//「✦ Google Drive ✦」 // 「✦ Curseforge ✦」
Make sure to only pick one version!
Recolor files
You don't like any of the colors, want to make it a bit more fancy or choose another font + style?
Then here you go, my .psd file with all backgrounds and all text layers for you to edit in Photoshop.
「✦ Simfileshare ✦」 // 「✦ Google Drive ✦」
And here is a short tutorial on how you can quickly modify all the text layers and how you can change out my original images with your edited ones:
Tutorial
Also: Check out what versions of TidyCAS others created!
Hope you enjoy! ~♥
You like my CC?
You can buy me a coffee on my Ko-fi ^-^
@love4sims4 @maxismatchccworld @emilyccfinds @sssvitlanz @mandy-ccfinds @mmoutfitters
#s4cc#ts4cc#yorucc#ts4#thesims4cc#customcontent#sims4casorganizer#casorganizer#castool#alwaysfreecc#tidycas
4K notes
·
View notes
Text
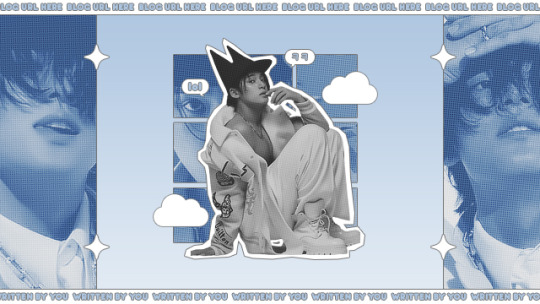
* ( ❀ ˆ꒳ˆ˵ ) ♡ Ꮺ 𝗧𝗜𝗡𝗬𝗧𝗢𝗪𝗡𝗦 — 𝖲𝖴𝖯𝖤𝖱 ੭

— introducing super , the latest psd template from tinytowns ! this template is supposed to be used for headers or pinned graphics + has been lightly inspired by comics + njz 's music video for hy.pe bo.y ❀ moderate photoshop knowledge is required to edit this template effectively , but it's really all just clipping masks + stroke layers : you are free to reach out at any point through ask for help ❀ download link is in the source code + under the read more along with some credits ❀ the font used is arista 2.0 alternate + has been linked below ❀ please like + reblog if you found this resource useful ❀ EDIT : updated 06/06/23 for no bars ver psd , prev + download under the cut ( ˘͈ ᵕ ˘͈ ♡) ~
❀ DOWNLOADS.
super template - here
super template ( no text bars ver. ) - here
arista 2.0 alternate - here
note: please be careful with the above link , i cannot remember where i actually got this font but i believe it was this source . if that's too much of a risk for you , i'd also recommend the font poppins which can be found here !
❀ EDIT.
coco from the future here letting you know that you must keep the top + bottom bars in order for your header to size correctly in the tumblr dashboard ! you can hide the text but don't remove the bars <3
UPDATE : bars issue solved with a resized version for people who want to use super as a header but without the bottom + top text bars. download this version here + look at the preview below !
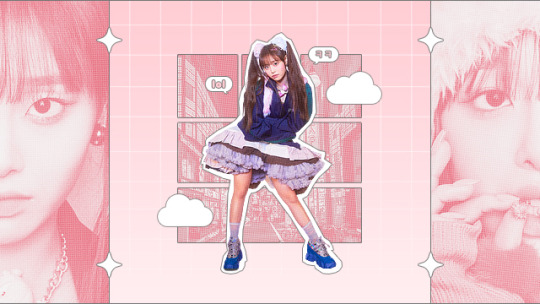
❀ CREDITS.
sparkle icon - Sparkle icons created by SeyfDesigner - Flaticon
cloud icon - Cloud icons created by Freepik - Flaticon
halftone pattern - sonicspeed123
#supportcontentcreators#photoshop#free rpc#free rph#rph#rpc#photoshop templates#muse template#photoshop template#header template#pinned template#ps template#template psd#template#resource#rph resource#rpc resource#free resource#free psd#rph template#rpc template#tinytowns#m: templates#m: resources#m: resource
425 notes
·
View notes